COPADO
Copado Functions
Copado is the preeminent release product for Salesforce and has a significant footprint in terms of its capabilities, within this set, Functions are probably the most powerful and certainly the most underused. Wearing my DevSecOps hat and bringing a history of bash scripting from my unix SysOps days, I have discovered the tremendous potential of Copado Functions. These functions are a powerful feature within the Copado release product for Salesforce, yet they are often underutilised.
At AppGenie, we're proud to be a certified Copado partner, and we've seen firsthand how Copado Functions can solve complex DevSecOps and Salesforce release problems in ways that other tools can't. With Functions, you can streamline and automate processes, saving time and reducing errors.
Let's explore the capabilities and potential use cases of Copado Functions. Creating a function is a straightforward process that involves writing a piece of code to perform a specific task. The beauty of these functions lies in their reusability - you can reuse the same code in multiple places within your Copado pipelines.
Functions can be used for a variety of tasks, from simple data transformations to complex integrations with external systems. Functions are reusable across different pipelines and projects meaning that you can build a library of reusable functions that your entire team can use, making it easier to collaborate and maintain your DevSecOps processes.
If you're a DevSecOps Engineer looking to turbocharge your Copado pipelines, functions are a powerful tool that you should definitely explore. At AppGenie, we're excited to help you unlock the full potential of Copado Functions. So, let's buckle up and get ready for a fun and productive ride
What is a Copado Function.
Copado Functions are predefined actions that can be used to automate certain tasks within the deployment process. For example, a Copado Function might be used to create a sandbox environment, deploy code from one environment to another, or run tests to ensure that the code works correctly.
Functions operate within a container on the Copado back-end platform, in my case this utilities Google Cloud Platform (GCP), this means that the container is running in country unlike the older implementation of Heroku that was based out of the US, thus making your Cyber team a little less nervous!
The container is instantiated when the Function is executed and discarded on completion as you would expect, the great feature of the container and the Function is that the Copado supported context can be utilised to perform actions via your script source
If your looking for the detail of what Functions are head to Copado Functions.
Before we begin
First thing to do is to confirm with Copado support that your environment actually has Functions enabled, raise a support case and ask them to confirm that the named credential for your org has been setup correctly, or not ... but if you get this error at least youve been warned!
    Copado API authentication failed. Create a Copado API key for your user in the Account Summary tab.
    Server response was: 401 body: {"status": "error", "messages": ["Job NOT queued", "Invalid request authentication"], "id": "a1j8u0000002uEiAAI"}
Likewise you may get an alert if you developing in a Sandbox environment that your credits are exceeded - again a support call to get this sorted is required.
Function execution limit exceeded. contact your account executive to get additional function credits.
On that note, Functions consume Credits - make sure you have enough allocated because you will be using them!
Lets get started!
Open your Functions home page, I usually just use the App Picker for this
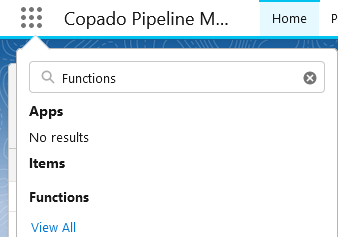
Once you have your Home page open - New will create a new Function record
-
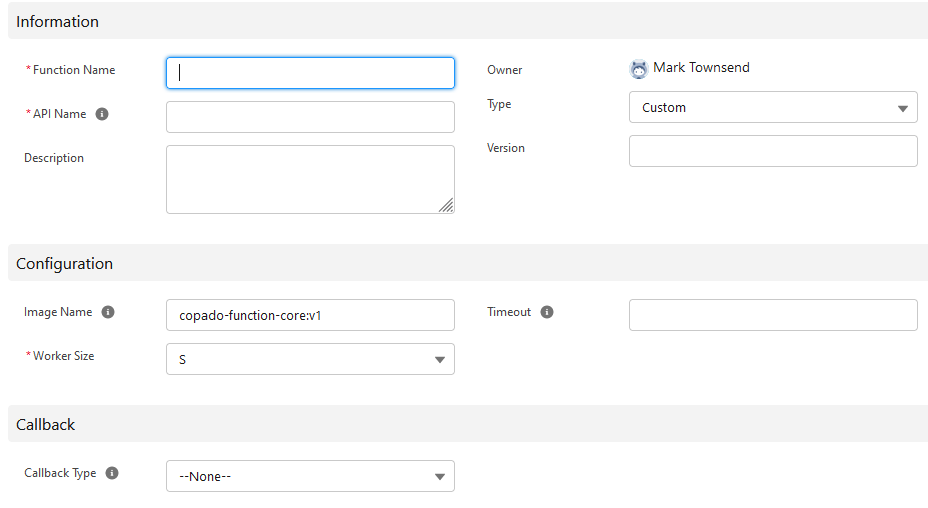
Function Name and API Name
Your Function name can be anything that describes your function, the API name though is required to execute your function via a Flow or Apex class so name it something sensible. You can rename later if you want so dont worry to much if you get this wrong. -
Type
Always "Custom", thats the whle point really. -
Image Name
There are a couple of container images and choosing the right type is important, likewise the size of the container has an implication in terms of how many credits you chew through to say "Hello World". -
Worker Size
Choose Small while developing, if you decide in Production you need some extra cycles you can always move on up the scale. -
Callback Type
I always use the standard callback Flow copado.MCCallbackHandlerTestFlow, I have written a custom callback provider but it seems to be a little redundant with the approach Ive been taking. -
Timeout
I usually leave this blank, I want my function to run to conclusion!
Images - breakout session ...
The Image you choose identifies the preinstalled components that are available within your container, choosing the right image makes your life alot easier because while you can install additional components - its not as streamlined as you would expect.
The specific impletation libraies and details for these are over in the Copado Documentation head there if you need to know the details, for me the only images I really use are copado-function-core:v1 for basic stuff and copado-multicloud-metadata:v1 for performing more complex functions utilising sfdx from the command line, for all the content below I'm using copado-multicloud-metadata:v1 so please choose that image.
As all of the images inherit from copado-function-core:v1 they all have the same supported behaviours of out-of-the-box communication layer with your Copado Salesforce org, including the ability to addd files to the Function result record that is created for every job excution. While this sounds great, most times you want to have more than just dumped results. We will go into that a little later!
-
Copado Function Core Image
This is the primary image it includes npm, git,curl, and jq so it contains pretty much most of what you need copado-function-core:v1 -
Commerce Cloud
Allows for Commerce Cloud deployments, including zip, unzip and sfcc-ci copado-multicloud-commerce-cloud:v1 -
MuleSoft
You guessed it, contains the jdk and aws cli components that can be used to deploy to Mulesoft copado-multicloud-mulesoft:v1 -
SonarQube
Includes ability to run a SonarQube instance, including jdk and mavern copado-multicloud-sonarqube:v1 -
DPL (Heroku)
Includes ability to deploy Heroku slugs through the Heroku CLI, including yaml and ruby and all ruby dependancies copado-multicloud-dpl:v1 -
Git Utils
Includes git-sizer, why .... I dont know, seems a bit useless to me and really should have been included in core but .... there you go. copado-multicloud-git-utils:v1 -
Metadata
Includes SFDX and vlocity so this is my primary go to image copado-multicloud-metadata:v1
Back to the fun
You've now setup your new function, except ..... It will always need a script before you can Save so here's another trick for you just enter the basics of your script into the Script Edit window ....

At this point you can Save without having to smash out that 1000 line script you have planned, theres a good reason to just limit your script initially to something simple and thats because you now want to add Parameters, this is where the good stuff starts!
Parameters
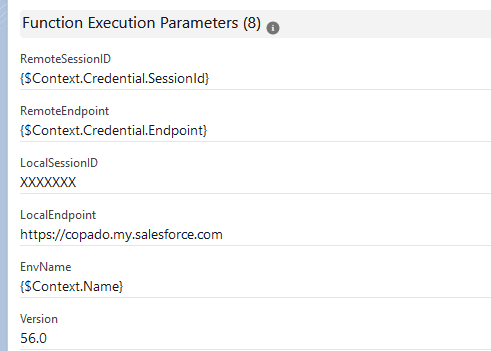
I pretty much use the same Parameters for every function, If I need additional Params then I tend to add them into all functions and leave these empty if they are unused. Theres a good reason for this when it comes time to execute the functions - Ill cover that later.
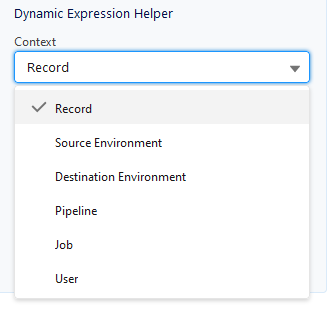
Context
Context is everything, so let me explain what the above parameters are doing for you, if you're after a list of these here's a good place to start
In the above case, the Context is the record that is specified at the point of execution for the function, I do a lot (all) of my scheduled tasks using the copado__Environment__c record so in this case the Context is the Id of the appropriate Environment record.
Using this Context the rest of this becomes:
-
$Context.Credential.SessionId
Assigned to the shell variable within the container named RemoteSessionID this contains the SessionId for the related Credential record ie. This is the user context of the logged in user against the Environment record. -
$Context.Credential.Endpoint
Assigned to the shell variable RemoteEndpoint this is the endpoint of the instance eg https://myinstance.my.salesforce.com/blah-blah -
$Context.Name
Assigned to the variable EnvName this is the name of the Environment record. -
$Context.Id
Assigned to the variable EnvID this is the record Id for the Environment record.
-
LocalSessionID
This is passed into the function and is the SessionId for the user running the function ie You! -
LocalEndpoint
This is the instance url of your Copado instance (you are running Copado in a seperate instance yeah?), eg https://copado.my.salesforce.com -
Version
Target API Version
Based on the above I have all the necessary information to login and execute against both my local Copado instance and the target Environment.
There are multiple Dynamic Expressions available under the Parameters most are based on the deployment flow rather than the Context record, here's the complete list.
Once we have the parameters you can enter the appropriate information into these and save them for use, when testing youre going to be doing this alot so you might as well save the values for later.
There is one trick to remember to get the LocalSessionID and that is using the following debug output from the Apex Console, you need this script as Salesforce will hide the UserInfo.getSessionId result.
system.debug(UserInfo.getOrganizationId() + UserInfo.getSessionId().substring(15));
Edit the Script
Now that we have sorted Parameters, lets get stuck into the script, I hope you have your bash shoes on.
First issue you will have is that the Edit script text area does not allow copy (its read only), second annoyance is once you open the edit form there is an annoying cursor issue that means that editing the current line will remove the last thing you wrote ... Hit ctrl-end before you type or select any text!
Lets start with environment setup, the following sets local variable instances from those passed into the function, its not strictly necessary but it helps when you have to strip characters or manipulate strings.
We also output some info to the function UI via the copado -p call, and finally set the environment variable for the sfdx package.
    copado -p "Establishing Environment"
    cd /tmp
    VER=$Version
    SFDC_URL=$(dirname "$RemoteEndpoint")
    SFDC_EP=$(echo $SFDC_URL|awk -F '/' '{print $1"//"$3}')
    export SFDX_LOG_LEVEL=info
Once we have the main Environment variables established, we create a directory for storing and executing our metadata.
    copado -p "Building Deployment Environment"
    mkdir force-app
    mkdir force-app/main
    mkdir force-app/main/default
    mkdir force-app/main/default/certs
    mkdir force-app/main/default/connectedApps
    mkdir force-app/main/default/samlssoconfigs
    mkdir force-app/main/default/settings
    mkdir force-app/main/default/classes
    mkdir force-app/main/default/customMetadata
    mkdir force-app/main/default/groups
    mkdir force-app/main/default/profiles
From this point we break out into function definitions for all of the common stuff we want to do, firstly set_env will specify the sfdx-project.json that contains the sfdx config file. To use this we call either:
-
set_env $SFDC_EP
Set the sfdx project to the target Environment -
set_env $LocalEndpoint
Set the sfdx to the Copado instance
    set_env() {
        copado -p "Establishing sfdx config against $1"
        echo -e "{" >sfdx-project.json
        echo -e "\"packageDirectories\" : [" >>sfdx-project.json
        echo -e " { \"path\": \"force-app\", \"default\": true}," >>sfdx-project.json
        echo -e " { \"path\" : \"unpackaged\" }," >>sfdx-project.json
        echo -e " { \"path\" : \"utils\" }" >>sfdx-project.json
        echo -e " ]," >>sfdx-project.json
        echo -e "\"namespace\": \"\"," >>sfdx-project.json
        echo -e "\"sfdcLoginUrl\" : \"$1\"," >>sfdx-project.json
        echo -e "\"sourceApiVersion\": \"$VER\"" >>sfdx-project.json
        echo -e "}" >>sfdx-project.json

        sfdx config:set org-instance-url=$1
    }
Once we have the above setup complete we can then use sfdx to perform all of the functions we require, for example:
#Deploy a package
deploy() {
copado -p "Deploying $2"
cd /tmp/force-app/main/default
echo -e "" > package.xml
echo -e "" >> package.xml
echo -e " " >> package.xml
echo -e " $3 " >> package.xml
echo -e " $2 " >> package.xml
echo -e " " >> package.xml
echo -e " $VER " >> package.xml
echo -e " " >> package.xml
sfdx force:mdapi:deploy -d ./ -w -1 -u $1 -l $4 --concise
}
    #Retrieve a package
        retrieve() {
        copado -p "Retrieving $1 to zipFile $2"
        sfdx force:mdapi:retrieve -r ./ -k package.xml --unzip --zipfilename $2 -w -1 -u $1
    }
    #Run an apex scipt
    exec_file() {
        copado -p "Executing APEX $2"
        sfdx apex run -o $1 -f $2
    }
    #Register a communities site
    reg_file() {
        copado -p "Publishing Community Site $2"
        site_name=$(cat $2)
        sfdx community publish -o $1 -n "$site_name"
    }
    #Pull a file down from the Copado instance Content Library
    get_file() {
        copado -p "Downloading content $2.$3"
        DOCCONTENT=$(curl "$LocalEndpoint/services/data/v$VER/query/?q=SELECT+Id+FROM+ContentVersion+WHERE+IsLatest=true+AND+ContentDocumentId='$1'" -H "Authorization: Bearer $LocalSessionID" -s|jq -r '.records[].Id'|sed 's/"//g')
        curl "$LocalEndpoint/services/data/v$VER/sobjects/ContentVersion/$DOCCONTENT/VersionData" -H "Authorization: Bearer $LocalSessionID" -s > $2.$3
    }
    #Update a file locally replacing parameters specified as {}
    update_file() {
        sed -i -e "s+{LocalEndpoint}+$LocalEndpoint+g" $1
        sed -i -e "s+{RemoteEndpoint}+$SFDC_EP+g" $1
        sed -i -e "s+{SHORTNAME}+$EnvName+g" $1
        sed -i -e "s+{STARTURL}+$STARTURL+g" $1
    }
    get_library(){
    FILES=$(curl "$LocalEndpoint/services/data/v$VER/query/?q=SELECT+Id,Title,FileExtension+FROM+ContentFolderItem+WHERE+ParentContentFolderId+IN+(SELECT+Id+FROM+ContentFolder+WHERE+Name+='$LIBRARY')+ORDER+BY+Title" -H "Authorization: Bearer $LocalSessionID" -s)
    echo $FILES > result.txt


    # Loop through the records and print the Name field for each record
    while read -r id title file_extension; do
        echo "Retrieving file $title.$file_extension"
        get_file $id $title $file_extension > $title.$file_extension
        update_file $title.$file_extension
        execute_file $file_extension $title.$file_extension
    done < <(jq -r '.records[] | "\(.Id) \(.Title) \(.FileExtension)"' result.txt)
    }
Next Steps
To string this together you need a Library that contains Apex files that can be executed against your Environment - as long as SFDX can execute them, you can do anything you like. That should be enough to get you started in your Copado Functions journey, once you have the above in a script execute it and then start debugging the output. Its not particularly easy as each step needs to be tested and it is way more laborious that you would think.
Next steps for me is to actually record the output of these functions against the Environment record, and yes I know thats extreme but I live, work and breathe in a VERY controlled environment where I need to have Promotion records that matches every update, including the ones made via these scripts.
I'm also planning on spinning these out into their own Git repo and pulling the content on demand ... thats for my future self though!
Congratulations, you made it!
Next month, Ill show you how to connect this stuff up so you don't have to run it manually (from the Execute Function button).
Thanks for reading along, feel free to send me your suggestions for your favorite Copado Function, Ive got a bunch of them together that automates pretty much everything I need to do on the Sandbox and Prod environments.
That was a lot of tech stuff for a post, I hope it helps you out and, as always, reach out and let us know how we can help at AppGenie.com.au.
This is article 1 on Copado Functions, in a series of 2. Please find links to each in the series.